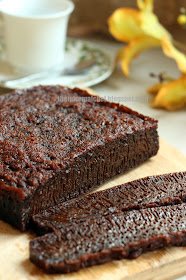
In line with the Ramadhan month, I am contributing this piece on Honeycomb Cake which is a traditional delicacy of the Malays. This cake is a perfect dessert to break fast. Wishing all my Muslim readers Ramadhan Kareem.
There are many names associated with this unique Malaysian cake. It is called Kek Sarang Semut as the holes resemble ants' nest. It is also called Kek Gula Hangus which translates directly into "burnt-sugar cake". It is aptly named such as the sugar is first caramelized until slightly burnt with a bitter aftertaste. It has a springy, slight chewy texture, and in case you are wondering, a strong toffee flavour to the cake. It does not really taste bitter when cooked.
The ingredients used are basically the same with that of a cake but with different measurements and technique. If you get a fluffy cake-like texture, most probably you have done it wrong. It has got to be springy instead of fluffy, dark and glossy instead of brown and airy. On top of that, you must have that signature honeycomb holes. I know it sounds daunting but it is actually quite a straight-forward recipe. The only equipment you need is a whisk and your measurement cup. Simple enough.
However, many have failed to obtain that elusive honeycomb pattern. After my third attempt, I can boldly name these two essential must-follow points for a successful honeycomb cake/ants' nest cake:
1. Have Patience - you have to let the batter sit and develop for at least 2 hours.
2. Use bottom heating element only - be it your stove, your induction stove, or oven; as long as the heat comes from the bottom.
If you follow these two points religiously, I am confident you will get your honeycomb too!
Honeycomb cake / Ants' Nest Cake / Kek Sarang Semut / Kuih Gula Hangus 蜂窝蛋糕
Makes a 7"x7" trayIngredients
A
1 cup plain flour
2 tsp baking soda
B
4 large eggs
1/3 cup condensed milk
1 tsp vanilla extract/essence
1 cup sugar
1 cup hot water
1/3 cup butter
Cooking Method
1. Heat sugar on a pan until sugar melts and turn to dark amber. It is ok to have a bitter aftertaste from the syrup as it would be diluted later.
2. Add in hot water and mix until caramel is free from lumps. Note: the water tends to splatter. Be careful when adding in. The syrup should look like dark coffee.
3. Remove from fire and add in butter. Stir until butter melts. Set syrup aside to cool completely. It is essential that the liquid be cooled completely before mixing into the flour or the heat will activate the raising agent prematurely.
4. In another bowl, lightly whisk together ingredients B until well incorporated but not foamy.
5. Sift ingredient A to a bowl and gradually mix in ingredient B until combined. Lastly, slowly mix in cooled syrup.
6. Sift batter into a 7"x 7" (or 6"x 6" for a taller cake) lined pan. Set aside for 2 hours.
7. Bake in oven, bottom heat only, at 140C for 50 mins to 1 hours until skewer comes out clean.
8. Cool completely before cutting.


Very delicious. I did not quite get the extent of the tunnels because I did not wait the two hours to cook (I waited no time!) and I baked it in a shallow pan. But ... the intention was to use it as the base for a honeycomb ice cream cake, and the texture / chewiness / softness was perfect, even after freezing. Lovely flavour and easy to make. I chose this recipe as it used slightly less eggs than other recipes as I was running low. I'll try it again when I have the time to wait!
ReplyDelete